
You are currently browsing the category archive for the ‘Sewing’ category.
Sewing technique continues to interest me as a research topic. The public library has pick-up service so I’m getting books again, but I’m also modern enough to embrace YouTube. One of my favorite sew-ists there is Bernadette Banner, who strongly recommends a leather thimble for faster hand sewing. Why not make one?, thought I.
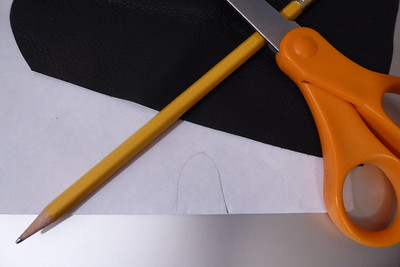
Step 1: Rummage around your coffee table until you find, hiding between two knitting magazines, the 35-cent scrap of leather you bought to use with your supported spindle for cotton spinning, and fish an envelope out of the paper recycling.
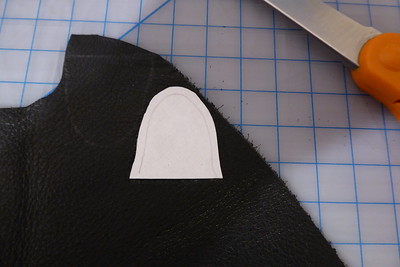
Step 2: Position the top joint of your needle-wielding (presumably dominant) hand’s middle finger on the edge of the envelope and awkwardly trace around it using your non-dominant hand with a pencil. Cut this out of the paper, trace it twice on the leather with a pencil, and cut out the two pieces of leather.
Step 3: Your leather needs holes evenly-spaced along all but the bottom edge. Try poking unsuccessfully with an unbent paper clip before you remember you have a small awl. Locate that mini-screwdriver set you got from the customer gift bin at the gravestone-maker’s shop in Germany as a kid (when your grandmother worked there and knew how proud you would be to own tools) and get the awl. Position the awl at the edge of your leather, notice just before disaster that your laptop has been underneath your work this whole time, and swap that out for a cutting mat. Position the awl again and poke holes evenly-spaced along the edge of each piece.

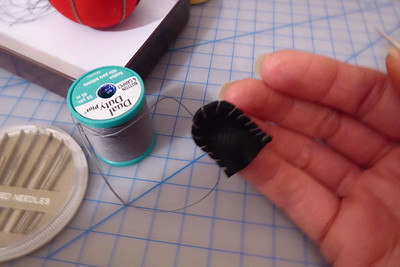
Step 4: Stack the 2 pieces with the desired outside sides on the outside and sew together with a whip stitch. I used heavy-duty polyester button thread and sewed it through twice at the beginning and end sets of holes. The needle’s eye needs to fit through the holes; the needle itself can be sharp- or blunt-tipped. You may need pliers to pull the needle through; mine went OK with a good push with a quilter’s thimble.

Step 5: Ta-da! Wait, you avocado… all these months of sewing, and you’ve forgotten the importance of seam allowances? This thimble fits your pinky. (And you didn’t use a mini-tripod so the photos are blurry.)
Step 6: Make a new paper pattern, this time adding a narrow seam allowance. Cut 2 fresh pieces of leather, poke holes, and sew together. It took me only 20 minutes to make the first thimble, and the second went even faster.
Step 7: Ta-da! (And the tripod got a clear photo of your bethimbled finger in the evening light.)

The thimble works well when I push a needle with the flat of my finger. I’m having trouble with the top — too much leather in the way — so I need to rip the seams, trim the top leather, and sew it together again.
Don’t have scrap leather? You can remove the leather patch off the back of a pair of blue jeans (hey, they don’t pay you to advertise for them, do they?) and use that for your thimble.
This weekend should have been Stitches West 2021. I haven’t missed it since the first time I went in 1999. Boo. It’s OK. I’m not missing it alone and I have lots of yarn and fiber in the house. I do truly miss the 3-day yarn party with like-minded friends. We’ll have to have an extra big one when we once again are able.
From 2 fox blocks in 6 hours last weekend, the cookie sheet of piles of cut fabric pieces

turned into 13 more foxes on Friday, bringing me to 15. All those eyes, looking up at me…

Someone asked me whether Mr. MmmYarn wore only blue-and-white shirts. No, he had variety. But these are the shirts I kept, mainly because they are 100% cotton.
Making multiples at once was such an efficient process that I cut 10 more sets of shirt fabric on Friday evening and used it up, bringing the count to 25 complete foxes by this morning. My piece alignment continues to improve, although challenged by using fabric from many-times-washed shirts, which is a bit warped. Gripe: cutting is so time-consuming! I cut tall piles of green, white, and navy eye/nose fabric last week and have gone through it all. [Uh, let’s see… 14 x 25 = 350 pieces so far, not counting the discards. Yeah, that’s a lot of cutting.]
The biggest assembly efficiency is continuous chain piecing: chaining until I have some 10 pieces hanging off the back of the machine, cutting off the last 9 and pressing as needed, then continuing to chain until all straight lines are sewn (you also waste far less thread chaining than sewing them one at a time). Chaining doesn’t work for the diagonals on my machine, but I learned I can lift the foot to pull a completed diagonal back an inch-and-a-half, and as long as I lift the needle to the point where the top and bottom threads are completely separate, I can stick in the next diagonal, saving thread and aggravation. The separation is important; slightly crossed threads jam my machine each time because they get caught on the point of the diagonal.
My quilting friend recommended I use “a fairy” to start at edges. Maybe it’s spelled “ferry” because it’s ferrying your project fabric’s edge under the presser foot. You stitch on a scrap of fabric for just a few stitches, at its edge closest to you, and then you chain piece it to your project fabric. I learned in October to stitch an inch on a scrap at the start of every machine sewing session just to verify everything is threaded and tensioned correctly; it didn’t occur to me to keep going with the scrap.

Those sly 2 foxes are actually piles of 5 blocks each
This afternoon, I assembled the pockets for the Casey Skirt (using the scrap fabric trick so my stitches could start right at the edge; bliss!) and began hand catchstitching the interfacing to the inner waistband so I can maybe finish that tomorrow. And I snuck in another hat as knitting relief throughout all this cutting and sewing. Busy, busy. Fortunately, no one is watching what else is (not) going on around here because there were compromises. The laundry is done, plants watered, and bills paid; the floors and other areas may be wanting attention. Ahem.

Watchful snowy egret, about to nab a fish
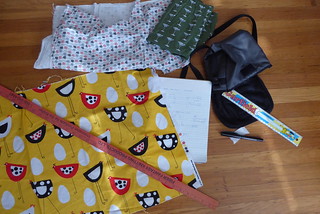
I realized with surprise it’s mid-afternoon already, which means I have been hard at work for over 6 hours. Furlough Fridays are for crafting, but it really is time for a break. Here is what I have been up to today:

In the background is the navy skirt with its coral lining, still in progress. I have the front, back, and side seams sewn and all 8 properly finished (so much hand felling!), and the zipper is in, although I see it’s crooked at the top 1.5″ on one side, so I have to unpick and re-stitch that bit. Next is pockets and waistband. And a big hem…
After taking a knitting break for the entire month of January (??), I made a little hat the last few nights. Actually, it’s one I made in December, but I didn’t like how floppy it got after a wash, so this week I unraveled and re-knitted it with needles 2 sizes smaller. This left enough yarn at the end to make an i-cord at the top, and, just for fun, I tried a 2-color striped i-cord. The fabric feels good after a wash, so I’ll weave in the ends when it dries.
I spent most of the day on Fancy Fox practice. Recent fabric shopping went well. I got green batik and off-white, which I cut up this morning, along with an old shirt of mine, into piles of different-sized pieces, then got to assembling. The first two blocks I pieced are in the unpicking pile because they’re lined up about as poorly as the practice block was. I learned the reason: my sewing machine’s presser foot’s edge is a little more than 1/4″ from the needle and that makes a big difference when a section is 5 pieces across! For the two blocks in the photo, I ran the fabric along the edge of the feed dog slot instead and got nearly perfect 1/4″ seams. I’m not aiming for precision blocks that look as though they were made by a robot, but I need them close enough to the right size so I can actually make a quilt top with them.
Where else did the day go? I spent time on triangle research. You can absolutely piece triangles but they’re fiddly. While I’m a beginner still trying to get pieces lined up properly, I will stick with squares cut on the diagonal line after stitching. I carefully unpicked the shirt before cutting, taking notes on shirt construction as I went. And after a lovely fabric-and-thread snarl around mid-day the sewing machine’s timing got thrown out of whack again, so I spent a while with a screwdriver and reading glasses, cautiously adjusting until things were working again.
It feels like two fox blocks isn’t a lot to show after a good crafting session, but all I learned — more efficient cutting, lining up that 1/4″, chain piecing, drawing the diagonal line in pencil on all to-be-triangles pieces in one go, sewing machine repair — means the rest will be easier. I also made design choices while tinkering. The shirts I’m cutting up are striped. I want the fox forehead to have a horizontal stripe and the rest to be vertical stripes, so I have to be a little fussy about cutting, but I am not going to worry about matching ears or cheeks along the stripes. If I had a vertically-striped forehead piece, it would bother me when the ear and cheek stripes didn’t line up; this way, with that horizontal break, I’m fine with it.
When Jupiter and Saturn approached their Great Conjunction, I pulled out the big binoculars that I have hardly used since March. I got a good look at the planets, and a lot of fluff in my eyes. I had forgotten the fuzzy lining of the binoculars case began to disintegrate some time ago, dusting everything in and around the case with what’s probably polyester fibers. Seriously, little black fuzzy bits that static cling to every surface, get in my eyes, it’s probably not good to be breathing around them, and I know it’s not good to wash them down the drain.
I intended to remove and discard the inner lining, but found it’s not a lining; rather, it’s part of the case’s fabric, whatever that’s called when two fabrics are completely fused together into one. What to do… how about a lining to cover the lining? I took careful measurements yesterday, then got out 3 candidates from the fabric stash.
Only the chicken fabric in quilting cotton was long enough, so chickens it is. I cut the pieces with a 1/2″ seam allowance,

(chicken fabric by Robert Kaufman according to its selvedge)
sewed the lining together with surprising ease, even around the dratted corners where I joined the side panels to the main part (handling slippery rayon for hours must have taught me a thing or two about sewing),

(I marked specific points along the edge with a bright pink rollerball pen so it would all line up properly)
laid it out next to the case to ensure it actually fit,

and began back-stitching it to the case. Here it is, about 1/3 done yesterday right before I lost the light:
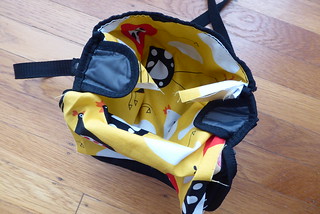
It’s secret sideways chickens! Added bonus: the bright lining will mean I won’t go hunting for the dark lens caps inside a dark bag anymore.
The mask I made yesterday has secret chickens inside, too. Well, secret eggs and chicken legs, at least. No cord yet, because I’m too stupid today to make a 4-strand braid, apparently (actually, I blame the sprained finger). The two masks I made months ago have secret kitties on the moon inside:

While stitching through the thickest part of the mask, where the seams join, the sewing machine made a terrible clunk/grind noise and stopped picking up the lower thread. Ugh. It was just in the shop a few months ago for pulling the lower thread only halfway around the bobbin. It turns out that’s called a timing problem and costs $99 to fix. Thank goodness the technician wrote the diagnosis on the shop slip; knowing what it’s called is helpful. I spent 45 minutes yesterday learning what a timing problem is and tinkering with the machine and it’s working again. Flush with success (ha!), I also fixed the doohickey in the toilet tank that stopped working properly 3 days ago. Not so much luck with my only pair of sneakers, which went kablooey on Christmas Eve: I went shoe shopping today.
There might just be yarn in the next post.
Christmas was quiet. My county has a Stay At Home order in place so I am spending the holidays –and the furlough days from work — at home. A mid-day family phone call of caroling was a nice perk. The day was also dark and rainy, making sewing with navy thread on navy fabric impossible even though I was eager to sew. I tidied the apartment instead.
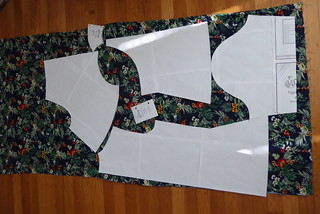
Remember the blouse I started in November? I could call it finished yesterday, 12/26. Yay! I put about 35 hours of work into this thing so I’m calling it a minor miracle that I stuck it through to the end.
It went from pieces:
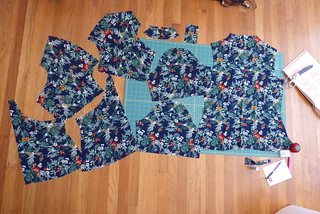
To sewn together (which you have seen here before):
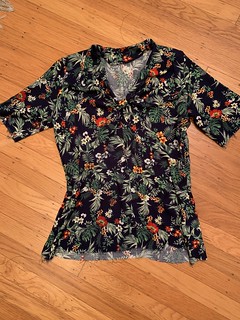
To something hemmed and finished:

Ignore the goose bumps , and glamour shots have to wait until the day I can actually visit someone who will wield the camera.
The pattern is Ngaio Blouse by Scroop Patterns (link). I made size 36 in size small for the top half and went out to size 40 for the bottom half, starting at the waist shaping. I also lengthened the sleeves by 2 inches.
Things I did well:
- I wrote down the needle size and stitch tension, so when I came back to it after a few days’ break and may have used the sewing machine for something else in the interim, I didn’t have to guess.
- I noticed (right before cutting!) the fabric’s print is directional and arranged all the paper pieces so the print would be right side up.
- I thought ahead and fussy cut the front gather strip so the large flower was right side up and on top.
- I picked the right size for me.
Things I learned:
- Check the fabric before it’s cut at the fabric store. A section of my fabric has far less saturated colors than the rest of it, noticeable in one of the lower front halves and one sleeve. I would have grabbed another bolt had I seen this.
- No chalk or sewing pen I own will make a mark on this fabric, and I have 5 types in the sewing box. I ended up using a regular ballpoint pen, very carefully and with low pressure, to mark certain areas, and made tailor’s tacks to mark the darts.
- When using the rotary cutter to trim back the seam allowance that connects the top and bottom sections of a front, be careful to not cut across the front bodice of what you have already assembled. Because then you get
to undo it all, cut a new piece, and sew it againmore sewing practice, yay! Thank goodness I had extra fabric. - Why is rayon not called fray-on? I mean, the cut edges just shredded to pieces while I was trying to get them tucked into seam finishes.
- Whacking the desk in sheer frustration after trying to fold fabric over into a tidy sleeve seam is a good way to mildly sprain one’s ring finger. It is puffy and sore today. There
may also have beenwas unladylike language involved, and I’m certain the neighbor downstairs heard me when I finally lost it. - Cut notches outward instead of inward when working with a fabric that frays like mad. It will make finishing seams easier.
In knitting, I say that what goes on on the inside of a sweater is nobody’s business. The same can be said for a sewn blouse, but as this is intended as an educational record, here is the inside of one armscye, with finished sleeve seams:
The part at the top of the photo is where I got into trouble. After sewing and unpicking 3 times (having to wait for a bright, sunny day each time), the fabric was dreadfully frayed, so I left it. It’s at least stitched over so it will stop fraying at some point. Every time I got it neatly folded over in that area, it came undone as soon as it hit the presser foot (hence the desk whacking). You can see I had less trouble with the seam finishing at the bottom of the photo.
All in all, I am pleased with the top. The print is not my style, really (after trekking to 3 fabric stores, I went with “least objectionable” rather than “print I like the most”), but I will wear it with pride.
ADDENDUM: How much did it cost? The pattern was $12.00 (and I used it twice; talk about a bargain when it comes to dollars per hour of entertainment!) I used my own ink and paper and tape to put the pattern together. I paid $10.58 for 1.5 yards of fabric and used about 2/3 of it, so about $7.05 of fabric. Close to half a big spool of thread (lots of ripping and re-sewing). Let’s say $21.00.
Some hard crafting time in the past 2 weeks and I have the Ngaio Blouse with non-sheet fabric assembled as of this evening, photographed poorly in evening light:
I will indulge in some gloating tonight, because I got the underarm seam of each sleeve to match up precisely with its corresponding side seam, something I typically fail to accomplish even with stick-to-itself quilting cotton, and this rayon stuff likes to slide around and spontaneously eject pins before I can get the fabric near the presser foot.

What remains? I need to finish the interior sleeve seams and neck, hem the sleeves, possibly adjust the back darts, then hem it and done. Maybe 5 more hours of work? So much could still go awry that I will enjoy this bit of triumph.
After 5 hours of diligent work yesterday in which I applied the patch pockets and made the waistband, the skirt mock-up I started on October 26 is ready for public view. I spent at least 3.75 hours on that waistband. You might be familiar with the steps: read the instructions and stitch, then unpick the stitches and squint at the instructions, more stitching/”drat”ing/unpicking, and then checking the designer’s blog where she has a tutorial that makes the instructions make sense.
I do vaguely remember this I-don’t-know-what-I’m-doing feeling in December 1994, when I learned to knit from a pamphlet, and for the following year or two as I upgraded from beginner to intermediate, except back then an online tutorial wasn’t an option. The learning curve for a new cake recipe is far less steep than this garment-sewing one and you can usually still eat a lopsided cake, and you can frog and re-knit a wonky hat, but sewing… well, mistakes feel far more permanent.
Behold, more fancy old bed sheet:

Yes, I am wearing my winter slippers which rather spoil the effect, but brrrr!, it got cold in here. You see long orange threads across the waistband because while I properly sewed it down on one side, I saved time by only basting its hem. You see small orange actual stitches peeking out here and there where I veered off course when attaching the waistband. I also pinned the skirt hem because I already have loads of hemming practice. The sheet doesn’t show the pleats at their best, but you get the idea. I like the large pockets.
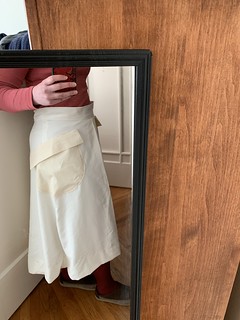
The pattern is Casey Skirt by Brijee Patterns (link). Looking at it from the side (and I am not leaning, just not very good at mirror photos), I like the general look, and need go down 2 sizes in the waistband and at least one size in the skirt when I make the real thing. Yay, a successful mock-up!
My beginner status means I can’t tell on these print-at-home patterns which markings, among all those dots used to line up the pattern pages so you can tape them together properly, are actual pattern markings that need to be transferred to the fabric when cutting. I missed a few dots on this one that I had to mark after I assembled pieces. I highlighted them and wrote notes on the paper pattern so I have a better time of it next go.
The household Kobold must still be unhappy with me: my size 4 knitting needles remain misplaced.
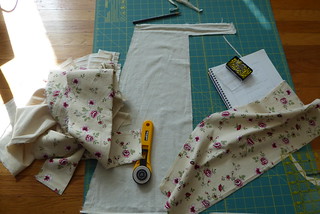
I managed to start a second mock-up garment during my time off from work. Here it is, at the not-exciting cutting stage on Monday. I spent the rest of Monday in 2 fabric shops, then at the Laundromat to wash what I bought, and then the daylight had gone.

It’s a 1940s-style skirt. Tuesday was for sewing. I have front and back seams sewn, zipper in, and pleats pressed and basted. That’s as far as I got by noon and I went back to work on Wednesday. (Earning the money to pay for one’s hobbies cuts into hobby time something fierce, yes?)
On Tuesday afternoon, I met a friend for physically-distanced spinning in the park. It was warm and not windy, absolutely perfect for handling fluff in the outdoors. Too much wind and your fiber supply blows into the path of the twist. We had a lovely chat in between people stopping to ask us what we were doing. Part of my spinning guild’s activities is to do demonstrations so I’m used to answering the public’s questions. I spun up nearly half of the two bundles of Sincere Sheep’s 80% Romeldale, 20% alpaca blend:

This is about 4.5 hours of work because it is a fine spin. I intend to make a heavier-than-laceweight 2-ply. We’ll just ignore the 6 bobbins of Polwarth/silk I spun last month that are waiting to be plied.
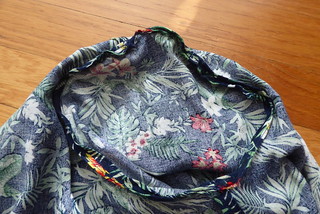
I continue to work, slowly, on the linen skirt. As part of flatlining, I’m hand-felling the interior seams before I sew on its long panel at the bottom. In its first iteration, I left all raw edges on the inside because I wasn’t sure how to handle them. Now I know this method and because I failed miserably at doing this by machine, I’m doing it by hand. It’s a 6-panel skirt so I have 12 of these to sew.

At the top of the photo is half the invisible zipper, also sewn in by hand (I can’t get an invisible zipper foot for my machine, it seems), and in the middle you see the interior seam with felling in progress on one half. The green-ish tinge underneath is a postcard I slipped between the lining fabric and the skirt fabric. Without it, I will (a) sew through the lining to the skirt fabric, which you’re not supposed to do, which leads to (b) sewing the entire thing to the leg of whatever I’m wearing. I speak from experience on point (b). Have you ever stood up and found a project dangling from your pantleg? Such fun.
And in park news, the Ferris/observation wheel got its cars installed last week and is in service, after being on hold for 6 months. I intend to ride it before it’s taken down. Another type of spinning altogether.

Onward.
I made great progress on the blouse mock-up yesterday and finished it as far as I’m going to for a test piece. I got loads more practice on finishing seams and the later ones are far neater than the early ones visible in yesterday’s photo.

Ignoring kindly, please, that I sewed in the left sleeve inside out, are those beautifully-sewn armscyes or what? I am so proud. Nary a wrinkle and both done on the first go. It helps that I have years of experience in easing knitted sleeves into armholes of sweaters. The same technique is needed here — pinching it off into halves and quarters as you pin it in place with 623 pins so you’re essentially juggling a porcupine while sewing — except a woven fabric is less forgiving. You can’t fudge it. I took great pains to prevent any folded-over fabric bits while stitching around. I’m also proud of the ruching, which took me a good 20 minutes to get folded down into a pleasing position.
The pattern is Ngaio Blouse by Scroop Patterns (link), and I bought it as a PDF that prints out on a bunch of pages I then glued together. It comes with two versions of the instructions, short and long. I used the long instructions which I can’t praise enough; I misunderstood step 8, despite the (d’oh!) clear image accompanying it, and overlooked part of step 12, the back inside neck finishing, so you see its raw edge in the photo. I dared to make one major adjustment before cutting the fabric: Because I am different sizes on top and bottom, I cut out the smaller size for the top part and when I hit the waist shaping heading down toward the bottom part, I drew a line down to the larger size and cut on that diagonal across size lines. Such a bold move.
Here’s a bad selfie. Small sigh… It’s a bit tight in the lower half even though I measured said half beforehand; I am wearing stockings and slip and skirt, adding bulk, but I also know I gained weight sitting at the sewing machine and having standing-over-the-sink snacks as meals for 4 days. However, this sheet fabric is pretty stiff and thicker than the fashion fabric will be and that’s a factor to consider. I like the neckline: modest and doesn’t gape (amazing! it’s a perennial problem for the small-busted ladies), and will allow me to wear a necklace.

This is now the fanciest bed sheet in the house.
Learned: When you sew ease stitching along the curved edge at the top of the sleeve, it’s going to pucker ever so slightly. It’s supposed to; don’t pull it out straight and then waste time fiddling with scrap fabric and stitch tension thinking your machine is broken, you ninny. The puckering shortens that curve, and will make easing the next sleeve into the next armhole much easier, maybe only 523 pins needed.
Things to note for when I’m ready to make the real thing:
- I need to practice sewing darts and cutting fabric along curves.
- Mark the point of waist shaping with a dot or tacks so I can more easily see where to pivot the stitching. I used 2 pins, risking running the needle over that spot.
- Cut the strip that holds the ruching in the front 1/2″ longer because I, the beginner, need a bit more space to finish its ends properly. 1/4″ more per end should do it.
- The shoulder seams are in the right place. I might cut the armhole and sleeve cap one size larger but leave the upper front pieces the same size they are now.
- I like the sleeves their un-hemmed length, so will cut them longer.
- Make sure the sleeve isn’t inside out. This will be completely avoidable once I use a fabric with two distinct sides.
Overall, such a good experience. It’s my first shaped garment ever. [In the only sewing class I ever took, 20+ years ago, I made a literal t-shirt — straight sides, straight sleeves — with quilting cotton fabric. Unflattering as heck.] I have my eye on Scroop’s The Miramar Dress as a potential future project. Imagine, a dress in which I am in control of top and bottom sizes and can avoid the back getting hung up on the, ahem, rear porch. The possibilities…
I am off for a walk to see if the fabric store is open — they’re not answering the phone, but that wasn’t unusual for them before March, and a 4-mile walk will do me good — and I will cook today even though the skirt awaits finishing.
An apt title, I believe. Ah, 2020… I need not detail it; we’re all aware of the situation. My last post was right before the Sheltering In Place began, the day I constructed a raddle for the (canceled) weaving class I was to take 2 weeks later. I went to Stitches West and to Monterey the last 2 weekends of February, and then things got weird, and busy.

I can count myself among the lucky ones: neither I nor friends/family have been sick, and my job is (a) one I can do mostly from home and (b) not on the list of laid-off positions. The 10-second commute is divine, but the very long work hours for the first 3 months at home wore me down to the point of panic attacks, and I’m feeling anxiety and depression symptoms I haven’t experienced in years, partly due to workload and partly to isolation. At least I can recognize and deal with it, to a degree. On top of those emotions, I have days when I feel angry and resentful because I’m a salary and not hourly employee, so when it approaches a 14-hour day, my pay is down at 50%. Hours have since scaled down to near normal, but they’re frantic and busy days and I’m not motivated to craft much after the work day is over. So, emotionally, I’m holding it together, but barely on some days if I may say so. Walks in the park are helpful.

Why, hello there, Pollen Face!
This week, I feel dang fantastic. Reason? I am on vacation! Not traveling, mind. I planned to join my parents at a lake this week, but when the cancellation deadline came, we made the decision to not go: the surrounding regions were on fire, with freeways closed, etc., so we would have had smoky air and nagging fear (although evacuating with a single suitcase wouldn’t be too bad) while there. I kept the vacation time and feel interested in life for the first time in months. I read several books and took care of household tasks. I am not sleeping normal hours, brain wakes me at 4:30am, absolutely raring to go with projects or reading. Never fear, I don’t “rar'” that early because I am certain the fellow downstairs would feel it un-neighborly.

Vacation means oodles of crafting time, and the first thing I did was address the problems with the skirt I sewed 3 years ago and have worn exactly 3 times. I don’t wear it because of what me the knitter would call a gauge accident: 6.5″ too big in the waist (well, now a little less so; I haven’t gained The COVID Nineteen, but it lurks there, threatening from the kitchen door). The times I wore the skirt, I used safety pins to bunch it up and paired it with a shirt long enough to cover the bunching. I painstakingly ripped all the wee stitching of its hems and seams on Sunday and Monday and re-planned the project.
Improvement goals:
- Take in the waist, naturally.
- Flatlining. Intriguing thing I read about and want to try.
- Curve the top by trimming the fabric. Apparently it should be 1″ shorter in the middle than at the sides, to accommodate the hip curve, before finishing the top.
- Add pockets. What was I thinking, making a skirt without pockets when I have complete say in its design?

As of Wednesday mid-day, I have it sewn into two halves and have half the invisible zipper in place. I am not speedy, even with the sewing machine.
The second sewing project is ambitious for a novice like me. Some shops have opened up, but fitting rooms have not, and shops largely don’t take returns. Why waste only money on something that may not fit me, when I can waste absolutely hours and hours of time trying to make something well out of my skill level that may not fit me? [big grin goes here… uh, WordPress has changed and I don’t know how to insert an emoticon]
Truly, it’s not time wasted. I am learning important skills that I’ve wanted to learn for a long time, I just have never applied myself to sewing the way I did to knitting. Here is a mock-up of a blouse, using fabric I cut from a retired queen-size sheet (no money wasted on fabric). This is the inside of the front on the left and the inside of the back on the right:

As it’s a learner piece, I’m using orange top thread, cream lower thread, and blue for hand-sewn bits so I can clearly see what I did. Learned so far:
- Darts are marked and sewn from the inside. None of my sewing reference books mention this. They all say “mark and sew the dart” like I’m clairvoyant. Fortunately, I own clothing with darts that I could examine. Nope, not a topless household here, waiting with goosebumps for the sewing to be done; we own shirts already.
- How to neaten up the cut edges inside to create nice(r) seams. My stitching along narrow edges leaves a lot to be desired (photographic evidence above); still, it does the trick and covers the raw edges, and that bit’s not seen from the outside.
- Hems and seams are not interchangeable terms. They get separate chapters in the books for a reason.
- Getting up and down off the floor to cut pattern pieces is fabulous exercise, although comes with attendant aches and pains the next day. Question: continue “exercising” this way, or clear an area on the dining table for the cutting mat next project?
Random hooray: Friday, my last work day before vacation, a blue jay came into the bedroom when I opened the window to put out a ladybug, and visited with me for a few minutes before leaving again. It made my day. He kindly did not poop on the bed when he hopped over to inspect its striped coverlet, good bird.
Random gripe: Gads, I miss the public library. E-books just are not the same.
Cheerio! Off I go to put the pedal, carefully and slowly, to the metal, for hours and hours to produce a few more seams. Reaching a hem may be too much to ask from only 1 day of work. Today I seam, perhaps tomorrow I hem.


