I was fortunate at Stitches West to be able to take the “Color in Fair Isle: from Inspiration to Motif” class taught by Janine Bajus, whose book, The Joy of Color, I bought a few years ago and have admired ever since. It hasn’t gone beyond admiration because too much to make, so little time (isn’t that always the way?).

Homework was to bring (an) inspiration source(s). My self-assigned homework was a gauge swatch with Shetland wool. I worked this with Jamieson & Smith 2-Ply Jumper Weight 2 weeks before SW:

2023-02-22_Jamieson-and-Smith-Shetland-2-ply-jumper-weight_swatch

Well, I guess I come out as a loose knitter with this Shetland yarn. For the lower part I used 3.0 mm needles and for the top part 2.5 mm. The 2.5 gives me a nicer fabric and, bonus!, the stitch gauge I need to knit the Bougainvillea Vest kit I bought at SW 3 years ago (although nowhere near the row gauge, harumph, and that pattern suggests 3.25 mm). On to class!

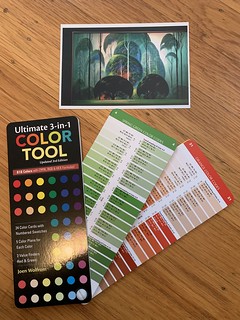
On day 1, you chose an inspiration and used the Ultimate 3-in-1 Color Tool by Joen Wolfrom to select a few likely color families. My source is a photo I took of a painting by artist Eyvind Earle that hung at the Disney Family Museum. I ended up using page 4 for spring greens, which range from pale to bright to very dark, and page 21 for oranges as my main color families. The greens in the painting really lean spring and not green greens; my eye sees blue greens in the photo but the Color Tool disagrees. Janine explained that brown doesn’t have its own page because brown is always a blend of other colors, and she was right. I found the brown yarns in class belonged to their color family pages.

2023-03-04_Color-in-Fair-Isle-class_step-1-color-matching

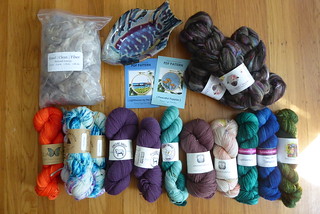
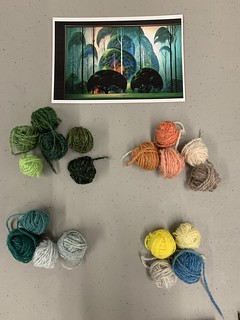
You then set the photo aside and went to the big yarn playpen containing 200+ colors of Jamieson’s Spindrift with only the Color Tool in hand to gather together colors from the pages you chose. The tool obviously does not have every possible shade of every color family, but holding the tool above the pile of yarns, yarns just jumped into my field of vision. It was so automatic and a little eerie. Choosing yarns took longer than I thought it would, up to the lunch break and a bit of time afterward. The goal was to end up with about 20 colors. Here are my choices next to the source photo.

2023-03-04_Color-in-Fair-Isle-class_step-2-yarn-selection

In the afternoon of day 1, we cast on for our speed swatches, the striped bit in the photo below. This swatch is to ensure your chosen colors have enough contrast to give you strongly visible diagonal lines between the groups. My diagonal lines worked out well and I was happy with all but the beige. Others in the class had to do more revising and longer swatches and that is OK.

Day 2 began with some more work on speed swatches and then launching into motif swatches. Decision: which group of colors to use as background and which as pattern? I settled on orange as background and green as pattern. Further decision: which pop color(s) to use? I agreed with Janine in her critique that the bright yellow I chose interrupts the eye from seeing the motif’s pattern against background. She suggested I swap the position of the pop color in that row — use the yellow as background instead of as pattern color — so I worked the second motif that way without ripping so I could compare them.

2023-03-05_Color-in-Fair-Isle-class_step-3-swatch

It is still not quite right to my eye although I really like it from a distance. I over-embroidered 4 or 5 other colors on both rows during class to see what might work and none really did. Earle used that blue I pulled and it didn’t look right in the swatch. I am not worried; there are lots of shades of yellow and other colors to try, plus I can try a different motif or two because it might just be this motif that doesn’t work. I also want to add the beige (actually an orange) from the speed swatch back in for motif swatching because in sunlight instead of classroom fluorescents, it reads differently.

I deliberately chose an inspiration in colors I do not normally work with, hoping that breaking from the usual would prevent my eyes from drifting to the shades I like best rather than allowing the class curriculum to do its job. I think I succeeded — I like my swatch.

It is not much knitting to show for 12 hours of class, and gads, was I tired. Two-day classes always do me in.

It’s hard to quantify what all I learned. Janine is a knowledgeable, kind, and well-practiced colorwork teacher so if this topic interests you, I recommend her highly. I gained a lot of confidence with that Color Tool booklet and wander the apartment holding it up to various objects, watching the color families jump out at me when I find the right page. I used it to identify the Annapurna I bought from AVFKW in “mollusk” as a purple (I saw it as a pretty but unclassifiable brown). I always thought I was hopeless at this — Mr. MmmYarn was good at color pairing — and it turns out I only needed some instruction. After seeing the yarn playpen, I have an urge to buy all 200+ colors of Spindrift and must resist, although I think I will eventually buy the 12 colors I used and see where the yarn takes me. Of course, the 14 skeins of Spindrift I already have in the bins are not in these colors. Fortunately, I have plenty of other things to knit in the meantime.

Stitches West in Sacramento has come and gone. I spent Friday in the Market and Saturday and Sunday in class. Here are the spoils of the Market:

2023-03-05_Stitches-West-loot

Top row: Shetland fiber from Clemes & Clemes, fish dish from Kunihiro Pottery at the Farm, embroidery patterns from Rosanna Diggs, Shetland/silk/firestar fiber from Goodie Supply Company

Bottom row: orange Mendocino from Bella Yarn, 3x speckled Tosh Merino Light from Madeline Tosh, 2x purple Cormo from Sincere Sheep, green Merino Sock from Lazer Sheep, 2 colors of Annapurna from A Verb for Keeping Warm, green and blue Dude from Schmutzerella Yarns, olive green Smitten from Wonderland Dyeworks

It is just 5,105 yards of yarn (under 3 miles) and 12 ounces of fiber this time. I went in intending to buy the 2 skeins of Sincere Sheep and possibly the 2 from AVFKW. Leaving with only 8 skeins more than planned is good, yes? 🙂 I didn’t plan to get mostly fingering weight, but that’s what I ended up with. No Addi Turbo needles or Jamieson & Smith yarn to be had this year. The Market was small already, and even smaller when it turned out a few vendors could not travel due to the weather.

I have plans for the Sincere Sheep. I have collected 6 colors of Cormo Fingering over several years and this is the neutral to tie them all together into a striped sweater. The Annapurna will be Rosemary Hill’s Mystery Shawl 2023. I didn’t buy the kit because I don’t need another project bag or another shawl pin, pretty as both were, and bought the yarn once I knew I could get the pattern without the kit. The KAL kicks off on April 21.

Leaving the hotel parking lot on Sunday, I noticed a fancy cupola peeking beneath bare and damp trees and realized for the first time that I had been across from the state capitol building the whole time. The joke’s on me for not noticing until then. To be fair, our room’s window had a view of the top floor of the parking garage and the weather was rainy, and I was distracted by yarn fumes, good friends, and tasty snacks. Next year, I need to plan part of Market day to wander the neighborhood. Just an hour won’t hurt, right?

Two years and a week since I grumped about Stitches West 2021 being cancelled, the MmmYarn household is in a messy flurry late this evening, getting ready for SW 2023. SW took place last year but I skipped it. The time since my last post has passed oddly, with days of crafting interspersed with days of moping. In an effort to steamroller some of the moping, I decided to commit to carrying on with normal events again, whether friends go along with it or not. I kicked it off with the CNCH conference in May (learned to weave on Mr. MmmYarn’s loom), continued with Lambtown and the Renaissance Fair in October, and this is the next big one. We’ll see how I do amongst the crowds this weekend.

My shopping list for the SW market is very short right now: one Addi Turbo needle in US 1.5 and maybe some Shetland jumper weight yarn, although Lost City Knits is not on the vendor list so we’ll see if anyone else has Shetland. By comparison to previous SW years, the vendor list is small. Friday is my shopping day; Saturday and Sunday I am in class with Janine Bajus. Two of my friends and one of their friends is going so we’ll be 4 in our little pod of knitters. It should be fun!

So I don’t leave you entirely fiber-less here, Lambtown yielded some good loot, including these two fleeces. Shetland at the top and Gotland at the bottom. I have not begun processing them.

2022-10-02_1157_Lambtown-loot_fleeces

Goodness, the process for adding photos here has changed. I’ll have to learn another day how to make this image smaller as it is time for sleep. Craft on!

Sewing technique continues to interest me as a research topic. The public library has pick-up service so I’m getting books again, but I’m also modern enough to embrace YouTube. One of my favorite sew-ists there is Bernadette Banner, who strongly recommends a leather thimble for faster hand sewing. Why not make one?, thought I.

Step 1: Rummage around your coffee table until you find, hiding between two knitting magazines, the 35-cent scrap of leather you bought to use with your supported spindle for cotton spinning, and fish an envelope out of the paper recycling.

Step 2: Position the top joint of your needle-wielding (presumably dominant) hand’s middle finger on the edge of the envelope and awkwardly trace around it using your non-dominant hand with a pencil. Cut this out of the paper, trace it twice on the leather with a pencil, and cut out the two pieces of leather.

2021-01-31_thimble-making-1_tracing

Step 3: Your leather needs holes evenly-spaced along all but the bottom edge. Try poking unsuccessfully with an unbent paper clip before you remember you have a small awl. Locate that mini-screwdriver set you got from the customer gift bin at the gravestone-maker’s shop in Germany as a kid (when your grandmother worked there and knew how proud you would be to own tools) and get the awl. Position the awl at the edge of your leather, notice just before disaster that your laptop has been underneath your work this whole time, and swap that out for a cutting mat. Position the awl again and poke holes evenly-spaced along the edge of each piece.

2021-01-31_thimble-making-2_awl-holes

Step 4: Stack the 2 pieces with the desired outside sides on the outside and sew together with a whip stitch. I used heavy-duty polyester button thread and sewed it through twice at the beginning and end sets of holes. The needle’s eye needs to fit through the holes; the needle itself can be sharp- or blunt-tipped. You may need pliers to pull the needle through; mine went OK with a good push with a quilter’s thimble.

2021-01-31_thimble-making-3_stitching

Step 5: Ta-da! Wait, you avocado… all these months of sewing, and you’ve forgotten the importance of seam allowances? This thimble fits your pinky. (And you didn’t use a mini-tripod so the photos are blurry.)

2021-01-31_thimble-making-4_too-small

Step 6: Make a new paper pattern, this time adding a narrow seam allowance. Cut 2 fresh pieces of leather, poke holes, and sew together. It took me only 20 minutes to make the first thimble, and the second went even faster.

2021-01-31_thimble-making-6_seam-allowance-this-time

Step 7: Ta-da! (And the tripod got a clear photo of your bethimbled finger in the evening light.)

2021-01-31_thimble-making-7_finished-thimble

The thimble works well when I push a needle with the flat of my finger. I’m having trouble with the top — too much leather in the way — so I need to rip the seams, trim the top leather, and sew it together again.

Don’t have scrap leather? You can remove the leather patch off the back of a pair of blue jeans (hey, they don’t pay you to advertise for them, do they?) and use that for your thimble.

This weekend should have been Stitches West 2021. I haven’t missed it since the first time I went in 1999. Boo. It’s OK. I’m not missing it alone and I have lots of yarn and fiber in the house. I do truly miss the 3-day yarn party with like-minded friends. We’ll have to have an extra big one when we once again are able.

From 2 fox blocks in 6 hours last weekend, the cookie sheet of piles of cut fabric pieces

2021-02-06_Fancy-Fox-quilt-fabric-pieces

turned into 13 more foxes on Friday, bringing me to 15. All those eyes, looking up at me…

2021-02-12_Fancy-Fox-quilt-first-15-blocks-done

Someone asked me whether Mr. MmmYarn wore only blue-and-white shirts. No, he had variety. But these are the shirts I kept, mainly because they are 100% cotton.  

Making multiples at once was such an efficient process that I cut 10 more sets of shirt fabric on Friday evening and used it up, bringing the count to 25 complete foxes by this morning. My piece alignment continues to improve, although challenged by using fabric from many-times-washed shirts, which is a bit warped. Gripe: cutting is so time-consuming! I cut tall piles of green, white, and navy eye/nose fabric last week and have gone through it all. [Uh, let’s see… 14 x 25 = 350 pieces so far, not counting the discards. Yeah, that’s a lot of cutting.]

The biggest assembly efficiency is continuous chain piecing: chaining until I have some 10 pieces hanging off the back of the machine, cutting off the last 9 and pressing as needed, then continuing to chain until all straight lines are sewn (you also waste far less thread chaining than sewing them one at a time). Chaining doesn’t work for the diagonals on my machine, but I learned I can lift the foot to pull a completed diagonal back an inch-and-a-half, and as long as I lift the needle to the point where the top and bottom threads are completely separate, I can stick in the next diagonal, saving thread and aggravation. The separation is important; slightly crossed threads jam my machine each time because they get caught on the point of the diagonal.

My quilting friend recommended I use “a fairy” to start at edges. Maybe it’s spelled “ferry” because it’s ferrying your project fabric’s edge under the presser foot. You stitch on a scrap of fabric for just a few stitches, at its edge closest to you, and then you chain piece it to your project fabric. I learned in October to stitch an inch on a scrap at the start of every machine sewing session just to verify everything is threaded and tensioned correctly; it didn’t occur to me to keep going with the scrap.

2021-02-14_Fancy-Fox-blocks_hat_Casey-Skirt-pieces_WIP

Those sly 2 foxes are actually piles of 5 blocks each

This afternoon, I assembled the pockets for the Casey Skirt (using the scrap fabric trick so my stitches could start right at the edge; bliss!) and began hand catchstitching the interfacing to the inner waistband so I can maybe finish that tomorrow. And I snuck in another hat as knitting relief throughout all this cutting and sewing. Busy, busy. Fortunately, no one is watching what else is (not) going on around here because there were compromises. The laundry is done, plants watered, and bills paid; the floors and other areas may be wanting attention. Ahem.

2021-01-18_1201b_snowy-egret

Watchful snowy egret, about to nab a fish

I realized with surprise it’s mid-afternoon already, which means I have been hard at work for over 6 hours. Furlough Fridays are for crafting, but it really is time for a break. Here is what I have been up to today:

2021-02-05_Skirt-hat-quilt-blocks

In the background is the navy skirt with its coral lining, still in progress. I have the front, back, and side seams sewn and all 8 properly finished (so much hand felling!), and the zipper is in, although I see it’s crooked at the top 1.5″ on one side, so I have to unpick and re-stitch that bit. Next is pockets and waistband. And a big hem…

After taking a knitting break for the entire month of January (??), I made a little hat the last few nights. Actually, it’s one I made in December, but I didn’t like how floppy it got after a wash, so this week I unraveled and re-knitted it with needles 2 sizes smaller. This left enough yarn at the end to make an i-cord at the top, and, just for fun, I tried a 2-color striped i-cord. The fabric feels good after a wash, so I’ll weave in the ends when it dries.

I spent most of the day on Fancy Fox practice. Recent fabric shopping went well. I got green batik and off-white, which I cut up this morning, along with an old shirt of mine, into piles of different-sized pieces, then got to assembling. The first two blocks I pieced are in the unpicking pile because they’re lined up about as poorly as the practice block was. I learned the reason: my sewing machine’s presser foot’s edge is a little more than 1/4″ from the needle and that makes a big difference when a section is 5 pieces across! For the two blocks in the photo, I ran the fabric along the edge of the feed dog slot instead and got nearly perfect 1/4″ seams. I’m not aiming for precision blocks that look as though they were made by a robot, but I need them close enough to the right size so I can actually make a quilt top with them.

Where else did the day go? I spent time on triangle research. You can absolutely piece triangles but they’re fiddly. While I’m a beginner still trying to get pieces lined up properly, I will stick with squares cut on the diagonal line after stitching. I carefully unpicked the shirt before cutting, taking notes on shirt construction as I went. And after a lovely fabric-and-thread snarl around mid-day the sewing machine’s timing got thrown out of whack again, so I spent a while with a screwdriver and reading glasses, cautiously adjusting until things were working again.

It feels like two fox blocks isn’t a lot to show after a good crafting session, but all I learned — more efficient cutting, lining up that 1/4″, chain piecing, drawing the diagonal line in pencil on all to-be-triangles pieces in one go, sewing machine repair — means the rest will be easier. I also made design choices while tinkering. The shirts I’m cutting up are striped. I want the fox forehead to have a horizontal stripe and the rest to be vertical stripes, so I have to be a little fussy about cutting, but I am not going to worry about matching ears or cheeks along the stripes. If I had a vertically-striped forehead piece, it would bother me when the ear and cheek stripes didn’t line up; this way, with that horizontal break, I’m fine with it.


After work tonight, I rooted through the box of fabric scraps and cut out the 14 pieces needed for a practice Fancy Fox quilt block:

2021-01-14_Fancy-Fox-quilt-practice-block-1

Less than 45 minutes later, a finished block looked up at me. During assembly, I found I cut the white fabric the wrong size so changed those out for yellow/white pieces:

2021-01-14_Fancy-Fox-quilt-practice-block-2

Oh, dear, I am rather hard on the eyes.

Positives: I only put in one piece upside down (one moon is doing a headstand), and only had to unpick one seam that I sewed together the wrong way. The two triangles at the bottom are supposed to overlap exactly as they do.

Negatives: I am certain I had all the pieces the right size and stitched with 1/4″ seams, yet the lower part of the block came out narrower than the top forehead/ears part. I have to re-measure tomorrow with fresh eyes to see if it’s me and my cutting or stitching, or a typo in the piece measurements given in the pattern. Getting all pieces lined up exactly will come with practice.

I am glad I did this because… I have to shop for fabric. Again. The project requires 4 types: I have a pile of shirts to cut up for the faces and a dark swirly navy for the noses and eyes; I don’t have a pale fabric for the cheeks or anything for the background. I planned to stitch the blocks and shop for background fabric further on, but I learned here that the background (purple) is required for block assembly. You can’t add it later. Binding and backing fabric can wait.

Research question, also for tomorrow: When piecing, is it usual to cut squares when the goal is triangles or trapezoids? It seems a waste of fabric to cut squares and sew them together, then cut off a chunk to get your diagonal line. Though thinking about sewing a triangle’s edge on the bias makes me cringe.

Tomorrow is Furlough Friday, during which I will spin. I joined the “Spindlers” Ravelry group’s monthly challenge of spinning a skein in a month (see last post’s end photo) and tomorrow’s the 15th and I am not at the halfway point yet, so some serious twirling is in order. Whee!

F is for Friday, and for furlough. To kick off 2021, after months of being closed to the public (= no revenue coming in), my workplace put employees on an 80% schedule, with Fridays off for the first 3 months of the year. The corresponding 20% pay reduction makes me grateful for my crafting stash because there won’t be money for extras. I am definitely pleased to have 3-day weekends for a while. What to do with the time?

F is for finishing. I hope to finish some projects, crafting and non-crafting, that have languished.

F is for fabric shopping. After I cut out the Casey Skirt and pinned it together, I decided I want a bit more heft and easier seam finishing so I bought some thin cotton today to use as flatlining material. It’s a hard-to-photograph vivid shade of salmon orange/pink, which will look nice against the navy when the wind inevitably exposes the lining to the world. I also bought two tools that were on my shopping list, a curved ruler so I can finish the flowered linen skirt I started re-making in October, and a little square grid ruler to make small cuts easier.

2021-01-08_lining-fabric-and-rulers

F is for foxes. When I gave away most of Mr. MmmYarn’s clothing, I kept some of his shirts, intending to make a memory quilt, uh, “someday,” with a mix of his and my old shirts. I bought the quilt pattern for Fancy Fox in summer 2018; it’s time I used it. F is also for foxing, common on household goods in an ocean-climate residence, so I have to send the whole lot through the wash before starting.

2021-01-08_shirts-for-Fancy-Fox

F is for phooey (phoenetically, it is). It’s going to cost me 2 loads at the Laundromat because I can’t wash the salmon fabric with the shirts. It means a trek to the bank to plead my case again for a roll of quarters. Looking at the photo, I also just realized I don’t think the darkest striped shirt will work for eyes and noses. We’ll see.

F is for frogging (sigh). These are mittens I made a good while back and decided to unravel because, while beautiful even without blocking, they have nowhere to go.

2018-07-01_Octopus-Mittens-front

Pattern: Octopus Mittens by Emily Peters
Yarn: Dragonfly Fibers Traveller, 100% merino, just about 57g / 140 yards each of purple and orange (no yarn labels in this kit)
Needles: US size 0
Started 12/21/2016 and finished knitting 1/25/2017, except thumbs, which I made 7/1/2018 (but never added the orange to them)

2018-07-01_Octopus-Mittens-palms

Such a pretty design, and I really like these colors. The mittens can’t go in the big box of finished items because no one ever wants mittens from me, and they can’t go in the Wool-Aid box because they depict an animal. So the yarn will be something else. Frogging/unraveling is all part and parcel of the knitting game and it means I get to enjoy this very lovely yarn a second time, and I can use the octopus chart on something else.

What could be more fun than first fourth (of the year) Friday furlough fox-y fabric frolicking? I had better be fleiβig*.

2021-01-05_Spinning_Royale-Hare_Polwarth_Point-Reyes-Reflections

* (German for industriousness and diligence, definitely needed in this household)


Although a small earthquake jolted me awake at 5:45am today, I intend to make it to midnight tonight so I can assist 2020 out the door none too gently with my foot. The year threw the family one last curve a few hours ago, and I for one am ready to see it go. Movies and booze are in order. I have “The Rise of Skywalker” to start off the evening, and pulled out some other entertainment to keep me going the remaining hours:

2020-12-31_ready-to-stay-up-until-midnight

This was the only little bottle of screwtop champagne the store had; I have no idea whether it’s any good but a screwtop is a must. I am averse to pulling champagne corks since The Incident that ended 2017…

I wish you a 2021 full of many happy hours of creativity. Cheers and Prosit!


If you are looking for knitting that brings you suspense! excitement! anxiety!, a project that keeps you on the edge of your seat 4 times as you watch the balls of yarn get smaller and smaller with each passing row, I will steer you toward the Andy shawl:

2020-08-13_Andy-Shawl_1

I totally won at yarn chicken in this, 4 times, ha! I have a yarn butterfly each of the gold and aqua yarns, and only a wee bit more each of the pale gray and pink, remaining. This is my first project with mini skeins and I’m not sure I can handle this level of excitement a second time, because yarn chicken comes with risks: you never know whether you will beat the chicken, or it will beat you.

I bought the pattern and yarn as a kit, together with project bag, at Stitches West in February. The kit colors differ from the pattern colors and I printed the pattern in black and white, so I took a black-and-white photo of the yarns to help me choose the order in which to knit the colors:

2020-03-27_Andy-Shawl-yarn-planning

CC1 in the original colors is the darkest. For me, that was Wish You Were Beer (gold).
CC2 is 2nd lightest: Barbie Girl (pink).
CC3 is lightest: Jackie O (pale gray).
CC4 is 2nd darkest: Set Sail (aqua).

This shawl starts at the top with a garter tab and works out to the point. The pattern has you change the order of the colors in the third color section, I presume so you can have enough of CC1 to finish the border. The designer contradicts herself on page 2, stating gauge is important and is not important; I can clarify that gauge is important if you have these particular mini skeins and intend to have enough yarn to finish, not important if you have more yarn. In that case, as usual with shawls, your gauge is perfect if you like the drape of what’s coming off the needles.

2020-08-13_Andy-Shawl_2-detail

Pattern: Andy by Laura Dobratz (Ravelry link) — I used version 3 of the pattern.
Yarn: Emma’s Yarn in two put-ups, 80% merino, 10% cashmere, 10% nylon.
Main color: Hella Hank (large): .9 skein, 135g / 540 yards of Thanks 4 Noticing Me.
Contrasting colors: Practically Perfect Smalls: nearly all of 20g / 87 yards each of Wish You Were Beer, Barbie Girl, Jackie O, Set Sail.
Needles: US size 6
Size: 72″ across and 25″ tall
Started 7/31 and finished 8/13/2020

Two minor deviations from the pattern: I worked row two of the main color’s border section in knit instead of purl (to make a narrow garter stitch edge instead of stockinette), and I didn’t pin out the picot points when blocking because I don’t have a large enough blocking surface, so they curl a bit. The pattern is written out, not charted, and I needed a marker only on the center stitch. I found it helpful to circle the (k1) that was the center stitch to help me keep my place.

The shawl is a size I like, is soft and comfortable, and reminds me of ice cream with caramel sauce.


Archives

Flickr Photos