
You are currently browsing the category archive for the ‘Mittens/Gloves/Wristlets’ category.
F is for Friday, and for furlough. To kick off 2021, after months of being closed to the public (= no revenue coming in), my workplace put employees on an 80% schedule, with Fridays off for the first 3 months of the year. The corresponding 20% pay reduction makes me grateful for my crafting stash because there won’t be money for extras. I am definitely pleased to have 3-day weekends for a while. What to do with the time?
F is for finishing. I hope to finish some projects, crafting and non-crafting, that have languished.
F is for fabric shopping. After I cut out the Casey Skirt and pinned it together, I decided I want a bit more heft and easier seam finishing so I bought some thin cotton today to use as flatlining material. It’s a hard-to-photograph vivid shade of salmon orange/pink, which will look nice against the navy when the wind inevitably exposes the lining to the world. I also bought two tools that were on my shopping list, a curved ruler so I can finish the flowered linen skirt I started re-making in October, and a little square grid ruler to make small cuts easier.

F is for foxes. When I gave away most of Mr. MmmYarn’s clothing, I kept some of his shirts, intending to make a memory quilt, uh, “someday,” with a mix of his and my old shirts. I bought the quilt pattern for Fancy Fox in summer 2018; it’s time I used it. F is also for foxing, common on household goods in an ocean-climate residence, so I have to send the whole lot through the wash before starting.

F is for phooey (phoenetically, it is). It’s going to cost me 2 loads at the Laundromat because I can’t wash the salmon fabric with the shirts. It means a trek to the bank to plead my case again for a roll of quarters. Looking at the photo, I also just realized I don’t think the darkest striped shirt will work for eyes and noses. We’ll see.
F is for frogging (sigh). These are mittens I made a good while back and decided to unravel because, while beautiful even without blocking, they have nowhere to go.
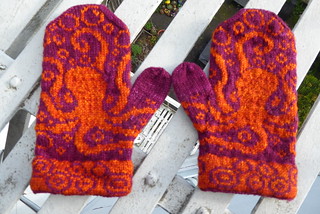
Pattern: Octopus Mittens by Emily Peters
Yarn: Dragonfly Fibers Traveller, 100% merino, just about 57g / 140 yards each of purple and orange (no yarn labels in this kit)
Needles: US size 0
Started 12/21/2016 and finished knitting 1/25/2017, except thumbs, which I made 7/1/2018 (but never added the orange to them)
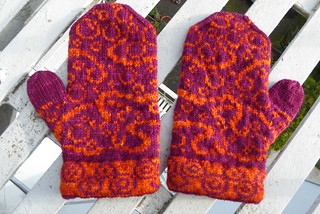
Such a pretty design, and I really like these colors. The mittens can’t go in the big box of finished items because no one ever wants mittens from me, and they can’t go in the Wool-Aid box because they depict an animal. So the yarn will be something else. Frogging/unraveling is all part and parcel of the knitting game and it means I get to enjoy this very lovely yarn a second time, and I can use the octopus chart on something else.
What could be more fun than first fourth (of the year) Friday furlough fox-y fabric frolicking? I had better be fleiβig*.

* (German for industriousness and diligence, definitely needed in this household)
How do you turn your ideas into finished items? I use sheets of notebook paper and a calculator. I do say “sheets” because it often takes a few goes before pretty yarn turns into a pretty finished object. These mittens were a request. The recipient wanted gray and definitely mittens. Additionally, one of the recipient’s hands is an inch shorter than the other, making it hard to find commercially-made mittens because they need the right amount of stretch to accommodate two sizes. Knitter to the rescue!
It took me a bit of time to find a gray I liked. I found the yarn at Stitches West 2018. It marinated more than a year (ugh!), then I set to it with swatches and notes. I used 4 needle sizes in my swatches and fiddled with different possible stitch patterns. Here is the last swatch:
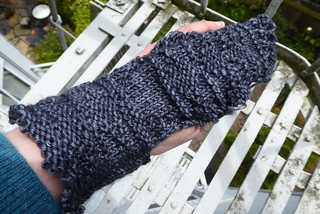
I did some in the round and some back and forth, and finally settled on size 2 needles and Fluted Rib from Barbara Walker’s “A Treasury of Knitting Patterns.” The recipient is a hiker, and with gray yarn I wanted something a little rock-y and a little reflective of the literal ups and downs of tackling a mountain on foot, plus I needed a row repeat that could be shortened without looking like a mistake. Here is a progress shot with lifelines and stitch markers in place at key points:

I only had to rip back to lifelines twice while figuring out the rate of increases for the thumb. Added bonus: you can dive right into Fluted Rib, no other ribbing needed to keep the cuff from curling. Once mitten #1 was done, the second was a breeze. The tight gauge and yarn’s bit of nylon content means these will wear well even with a life of grasping hiking poles. Here they are, done:


Pattern: own
Yarn: 139 yards Backyard Fiberworks Meadow, 80% merino, 10% cashmere, 10% nylon, color: Stormcloud
Needles: US size 2
Started 5/19 and finished 6/2/2019
They fit well (see photographic evidence!) and the recipient likes them. And her hiking friends do, too. Success!
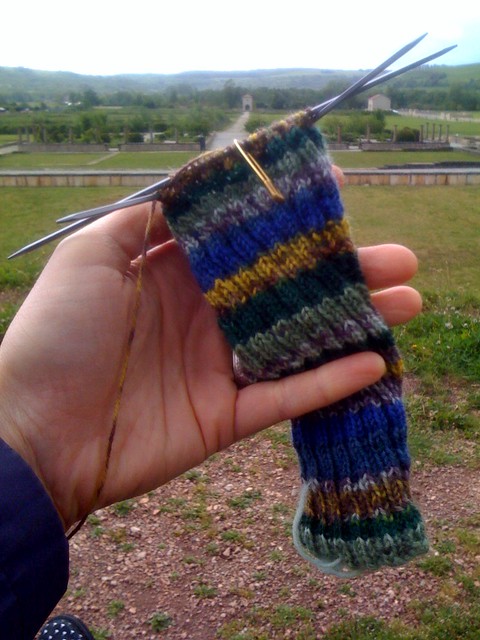
In Bliesbruck-Reinheim. This was all the airplane knitting I did on the flight to Germany, with some unraveling and re-knitting here and there during the trip. I am generally way too busy visiting people to get much knitting time, plus I slightly sprained a finger somehow on day 1, slowing knitting progress on this project.
My cousin ordered plain black wristlets after I watched her reject several pairs in stores. I’m not exactly sure what the others were lacking (price may have been a factor — teenagers aren’t usually rolling in cash), but I know she’s picky about length and circumference so I got detailed specifications from her and made these:

So hard to get a good photo of one’s own wrists.
Pattern: own
Yarn: .25 skein KnitPicks Stroll, 75% superwash wool, 25% nylon, color 23701
Needles: US size 1
Started and finished 2/24/2013
Stroll is plain old sock yarn: no twisting or splitting, just easy to work with. The pattern here is quite complicated: cast on 48, work k2 p2 rib for 38 rounds (which is a few rows past where I was sick of it), bind off. For the second one, contemplate working fewer than 38 rounds because it’s boring and hard to see the stitches in black, but concede that your fashion-conscious cousin will never wear them if one is shorter than the other. Have at it! I have no idea whether she has ever worn them, but I kept my promise to her and made and mailed them.
I was only able to make these because I made a colorful scarf a few days before. This is the design I call the Tapered Zickzack Scarf (because I like the German word “zickzack” better than the English “zigzag”) and I’ve made several.

Pattern: own (garter stitch plus an 8-row repeat called Eyelet Points, from page 70 of “Knitting on the Edge” by Nicky Epstein, on the edge)
Yarn: 1 skein Noro Silk Garden Sock, 40% wool, 25% silk, 25% nylon, 10% mohair, no label but assume it’s color S87
Needles: US size 4
Size: 7″ x 70″
Started 2/4 and finished 2/14/2013
I think this is the best version yet, taper-wise and how I made the ends. Mr. Quixote wears it boldly:

I’m not so sure I’d use this yarn for socks. Despite its nylon content, it feels too fragile for footwear. It should last forever as neckwear.
Nearly-Thanksgiving is an odd time to be doing February write-ups, but I’ve been really remiss this year in organizing photos and project notes. This past Sunday I sat myself at my desk and caught up to December 2012 completely, both on paper and in Ravelry, with a foray into the early months of 2013. If I can keep the momentum going, I might just be in real time by the end of the year. I’ve kind of forgotten what that’s like.
I spent the better part of January making mittens and ended up with 10 pairs for Afghans for Afghans’ winter campaign.

I should have photographed them at a different angle so you can see there are 20 individual mittens there, it would have been a more impressive-looking pile.
Pattern: Basic Mitten Pattern by Ann Budd, as published in “The Knitter’s Handy Book of Patterns”
Yarn: Black Water Abbey 2-ply Worsted, 100% wool, 3.75 skeins Jacob (brown) and .47 skeins Navy
Needles: US size 5 (and 6)
Size: 2 pairs each of 5 sizes (ages 4-6 through men’s small)
Started 12/29/2012 and finished 1/31/2013
I made 2 pairs size 4-6 and 2 pairs size 6-8 using size 6 needles, and because my gauge was exactly between gauges in the book I made 1 pair at each gauge’s stitch count (hence the different shapes for the smaller mittens), at which point I decided the stitches were a little loose for a cold wind. I slightly felted those first 4 pairs and made the remaining using size 5 needles and also switched to 2×2 ribbing for the cuffs. Better pairs: 2 pairs size 8 to women’s small, 2 pairs women’s medium, 2 pairs women’s large / men’s small. The needle change had the added benefit of working out to the exact gauge specified in the pattern. Then I ran out of steam and also hit the campaign’s deadline so I stopped at 10 pairs.
The Black Water Abbey yarn I have isn’t colorful but it is a great wool for cold conditions. I bought it for a sweater for me that never materialized and I’m glad to have decided to donate it. A4A was happy to have the mittens. I have yarn left so I’ll make some more again.
In February I volunteered to pack donated materials. Here are two boxes of hats we packed that day:


Behold the variety!
And a box of mittens; mine are at the bottom of this box.

While packing, I had to weave in the ends on a couple of pairs and had to reject a few. Among the rejects: one adult-size pair had thumbs so tiny that a ballpoint pen wouldn’t fit in there, two pairs were obviously acrylic, and two pairs were lovely but worked in an openwork lace pattern that didn’t fit with a4A’s needs. Those last 4 got donated to an American charity (don’t know which one).
Current campaign: 500 pullovers. I started one but got sidetracked with other knitting. For those of you who are donating to this or any charity: please check the campaign’s guidelines, weave in your ends, and make sure your garment fits a human body (we had some odd, not-head-shaped hats, too)!
The Alpaca Ranch Retreat I went to in December was also a Kira K Designs trunk show and after having seen the Reticulated Mitts in person, I bought the pattern. Pretty mitts, and they have been keeping my mitts toasty warm since I made them!

They look good flat, too:

Pattern: Reticulated Mitts by Kira K Designs
Yarn: .75 skein Black Diamond Alpacas Sport Weight Alpaca, 100% alpaca (what else?), color: Victorian Red
Needles: US size 1 for the ribbing and 3 for the rest
Started 1/12 and finished 1/16/2013
The tight gauge combined with the twisted stitches must keep this yarn in line; the mitts haven’t sagged at all with the usual alpaca droop. They also didn’t felt when I had to scrub out pine sap after snapping the photos (camera and elbows were propped on a felled tree). Again, perhaps the gauge was helpful… maybe it prevented the fibers from moving around enough to felt?

The pattern is meticulously well-written and the stitch pattern is charted as well as written. If you’re new to twisted stitches, this is a good one to start with.
Tonight’s task: add thumbs to pairs 9 and 10 of the mittens I’m making for Afghans for Afghans:

One of these days I have to take a photo outside on my lunch break instead of inside on the couch.
“Max Poweeeeer! He’s the man whose name you’d love to touch, but you mustn’t toooooouch! … ”
Oh, sorry, I got distracted there for a moment. My friend’s son Max was born in January (his last name is not Power), and to celebrate the occasion I made him a little cardigan. It’s the same pattern I made for my nephew last fall.

Pattern: One-Skein-Wonder Baby Sweater by Linda Burt, published in One-Skein Wonders: 101 Yarn-Shop Favorites
Yarn: .63 skeins James C. Brett Marble Chunky, 100% acrylic, color MC10
Needles: US size 10.5
Buttons: from Gail Hughes Art Buttons
Size: one size
Started 2/25 and finished 3/5/2012
I made the same modifications I made last time. Here you have them again:
- The one row of garter stitch at the bottom isn’t enough to prevent the body from rolling. I cast on 73 st instead of 72 (so the rows would end on the same stitch) and did 3 rows of seed stitch, then started the pattern. It took me under 3 hours to knit the entire body and do 3 needle bind off at the shoulders.
- Collar: I picked up 36 instead of 34 st and worked in seed stitch.
- Sleeves: I picked up 38 instead of 34, worked them in the round, and did seed stitch at cuff.
His mom put in a fair bit of work to contribute to his arrival so I thought I’d give her something nice, too, something a bit superhero-ish because bringing forth a little one is in my opinion a heroic effort:

Pattern: Beaded Pulse Warmers by Véronik Avery, as published in Knitting Classic Style
Yarn: JaggerSpun Zephyr Wool-Silk 2/18, 50% wool, 50% silk, color Ebony, held doubled throughout
Needles: US size 0
Beads: #6 hex beads from Twisted Sistah Beads & Fibers
Started 3/3 and finished 3/19/2012
Minor modifications: I worked 11 repeats of the pattern instead of 10 and joined it with a 3-needle bind-off instead of a graft.

It’s so very hard to take a photo of your own wrists. Out of some 25 photos this was the best I got.
It’s high time I showed you the little wristlets I learned to make at the end of February. These were the product of the “Lapland Hand Garments” class I took at Stitches West, taught by Susanna Hansson. The technique is from the area of Finland around Rovaniemi; we learned there isn’t a big knitting tradition there because there aren’t many sheep, hence not much wool. Traditionally, they stuck with small stuff.
In class, we first made a practice wristlet using worsted weight yarn. This was so we could learn the technique before heading into a small gauge with colors of our choosing. Here again is the practice wristlet in traditional colors that I finished in just under 2 hours and the actual project started right before lunch:

On the practice wristlet, you can see my stitches are looser at the bottom and tightened up toward the top as my technique improved. While I have kind of a super hero-ish feel when I wear it on my wrist, I’m not inspired to make it a mate. I use this as a glass cozy when I get hot tea at Monday Night Knitting.
I was definitely inspired to both finish and make a mate for the fine-gauge wristlet. The actual project is worked on US size 00 needles. It turns out is is far harder to take a picture of my own wrists from the top than I thought it would be. So here they are from the other side:

Pattern: Lapland Hand Garments class project: Wristlets, by Susanna Hansson
Yarn: Vuorelma Satakieli, 100% wool
Needles: US size 00
Size: adult
Started 2/26 and finished 3/22/2010
Worked three repeats of pattern chart
They are very pretty and work well as warmers. I am wearing them right now while typing because it is chilly with a capital C in the apartment today. Susanna was a good teacher. She is engaging, speaks and demonstrates clearly, and knows her mitten lore. She gave a slideshow of various traditional garments, all with the wearers wearing mittens, in the afternoon. I recommend her as a teacher.
The technique is interesting. You use a separate strand for each zigzag of color and the strands are carried up very neatly on the inside. Always working the main color over the contrasting colors means the main color has floats. The contrasting colors then trap the main color’s floats on the following round so you get a tidy interior:

About all those bundles of yarn in the first photo in this post: that’s the trick to keeping the yarn organized. Make little yarn butterflies for all 11 lengths of contrasting colors, thread them onto a straight knitting needle, and rotate either your project or the straight needle every round to keep everything from tangling. It worked like a charm for preventing tangling; however, my straight needle wasn’t long enough so I had trouble pulling more yarn when needed. It kept wanting to stick to its neighboring color. So I waited to make wristlet #2 until I purchased these cool bobbins that have a hole in the middle, allowing me to organize my colors on a straight needle without all the clinginess:

Sorry, Susanna. I know the whole point was to use the traditional technique.
One drawback to having 11 bundles of yarn plus a main color is you end up with 24 tails to weave in per wristlet. Yep, “48” was in the running as a post title.
We did have a discussion in class as to whether a full day of class was enough. The general consensus was that a two-day class would be better. I would have wanted a split one-day class: a morning of learning the technique with an afternoon wrap-up the next day to address any questions or problems. I realize this isn’t going to happen at Stitches West, but it’s my opinion. I learned the technique quickly but found my execution to be slow, had less than half a fine-gauge wristlet by the end of the day.
When I went down to visit my parents last weekend, I had my stepdad get a photo of my wrists. Much better here:

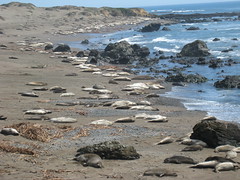
And I have to include gratuitous photos of the elephant seals from that trip:

My mom says this isn’t many, this is few. When there are many, you cannot see the sand. Something to think about, isn’t it? Here they are in all their glory. There are seals all the way up in the dunes. If you look at the big version of this photo, you can see the ones in the dunes flipping sand onto themselves.
What’s that? You wanted to see more mittens? OK, I leave you with cell phone photos I snapped in class. Susanna had a table in back covered in absolutely exquisite mittens and mitts. The little ones are no larger than the top joint of my thumb:


The gentleman who knits these wee mittens must have incredible eyesight.
I finally finished the sleeves on my purple cotton sweater this morning. Yay! Now comes blocking and sewing it together, so I guess that means you won’t see it here anytime soon.
I am also fiddling with some cuffed mittens. Excuse the weird coloring in this photo; it’s hard to get a good shot under lamplight inside the apartment. I can assure you the colors are beautiful:

P.S. I received payment for the IOU from last week = another hat gone to a happy owner!


